The Create Episode dialog includes an editor. Once you open or drag-and-drop the files of your episode in the waveform area, you can reorder them, add or remove breaks, and trim each file.
Basics
|
|
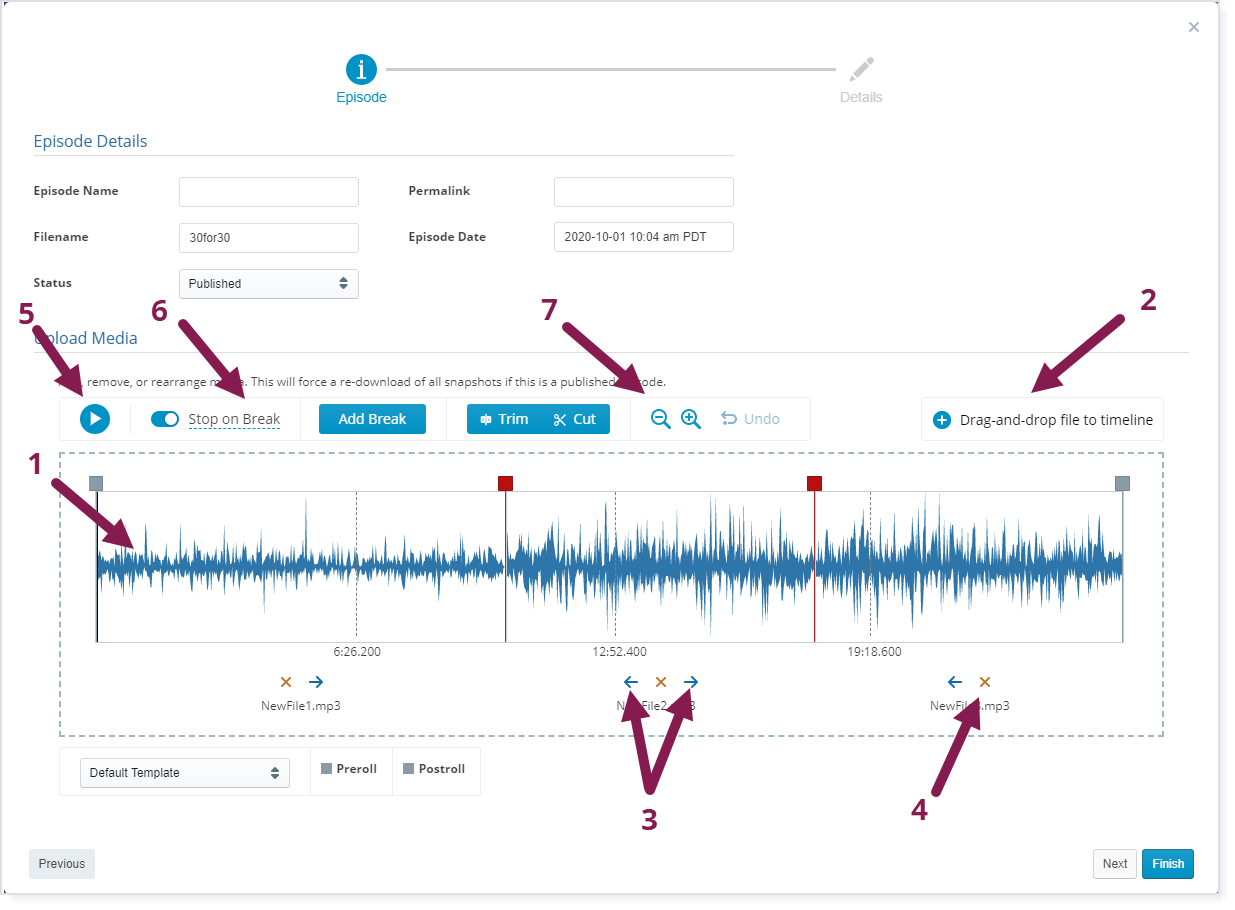
•To add files, drag and drop them into the waveform area (1 in the screenshot above), or click Drag-and-drop file to timeline (2).
•To change the order of the files, click the arrows ![]()
![]() above the file names (3).
above the file names (3).
•To remove a file, click the red X icon ![]() above the file name (4).
above the file name (4).
•To play the files in order, click the Play icon ![]() (5).
(5).
•To play a particular spot in a file, move your cursor over the waveform and click where you want to listen.
•When Stop on Break (6) is active, the playback automatically stops when you reach a break.
•To pause, click the Pause icon ![]() , or use the space bar on your keyboard to toggle between playing and pausing.
, or use the space bar on your keyboard to toggle between playing and pausing.
•To zoom in or out on the waveform, use the zoom buttons ![]()
![]() (7).
(7).
Adding and Editing Breaks
|
|
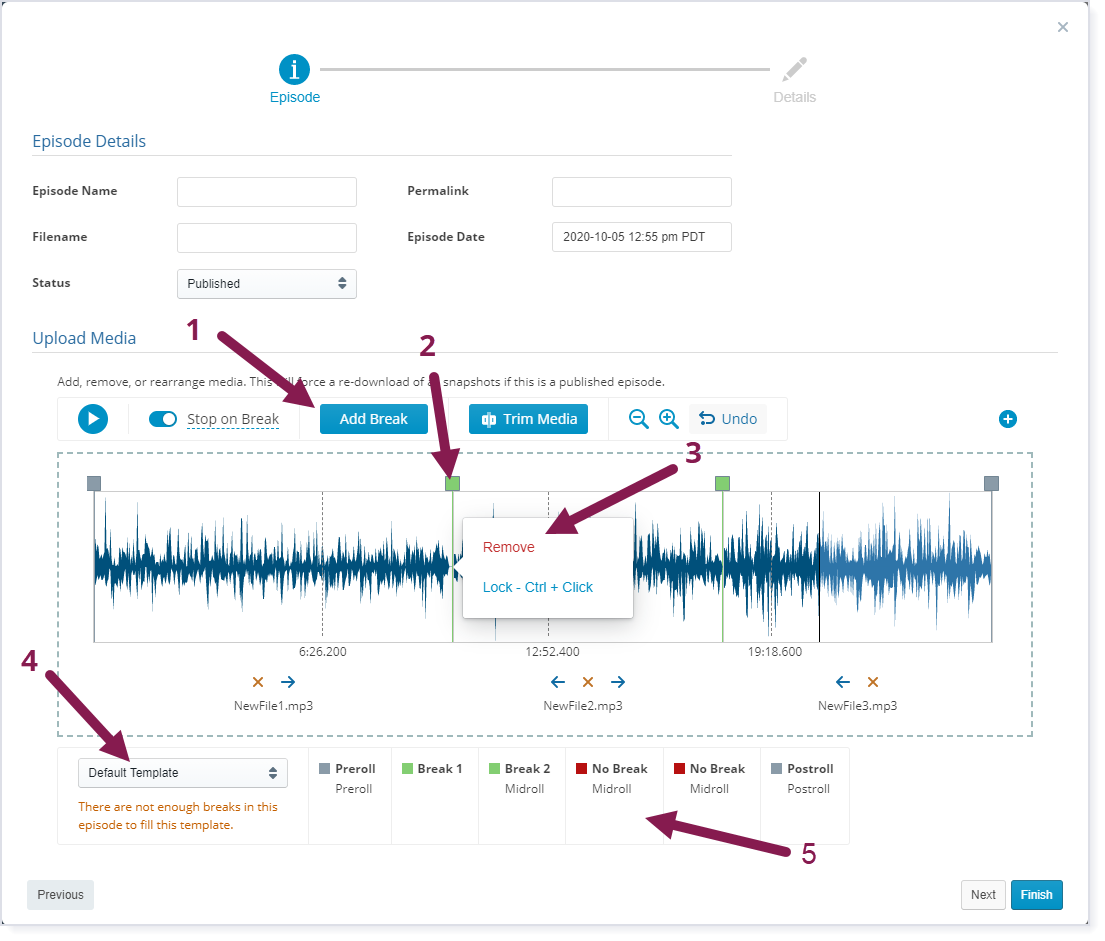
•Breaks appear as squares above the waveform, with a descending line to show where exactly they are placed (1). To move them, click and drag them along the waveform.
Breaks automatically appear between files and breaks specified in ID3 tags appear in the editor.
•To add a break, click in the waveform where you want the break to appear, then click Add Break (2).
•To remove a break, click its square and then select Remove (3).
•Use the dropdown menu near the bottom (4) to preview how the episode you are editing will look with different templates.
That template's break indicators appear in a row (5) to the right of the menu in three colors:
oGray indicates preroll and postroll breaks.
oGreen indicates midroll breaks.
oRed indicates excess breaks that will not be played no matter what template is used.
For example, suppose you have three templates that might be used for this episode. The templates have one, two, and zero midroll breaks. If you insert four midroll breaks in the waveform editor, two indicators will be red because none of your templates has four midroll breaks. The other two indicators will be green because one of your templates has two breaks.
Note: The template menu does not assign a template to the episode.
Trimming
|
|
If you need to trim the beginning or end of a file:
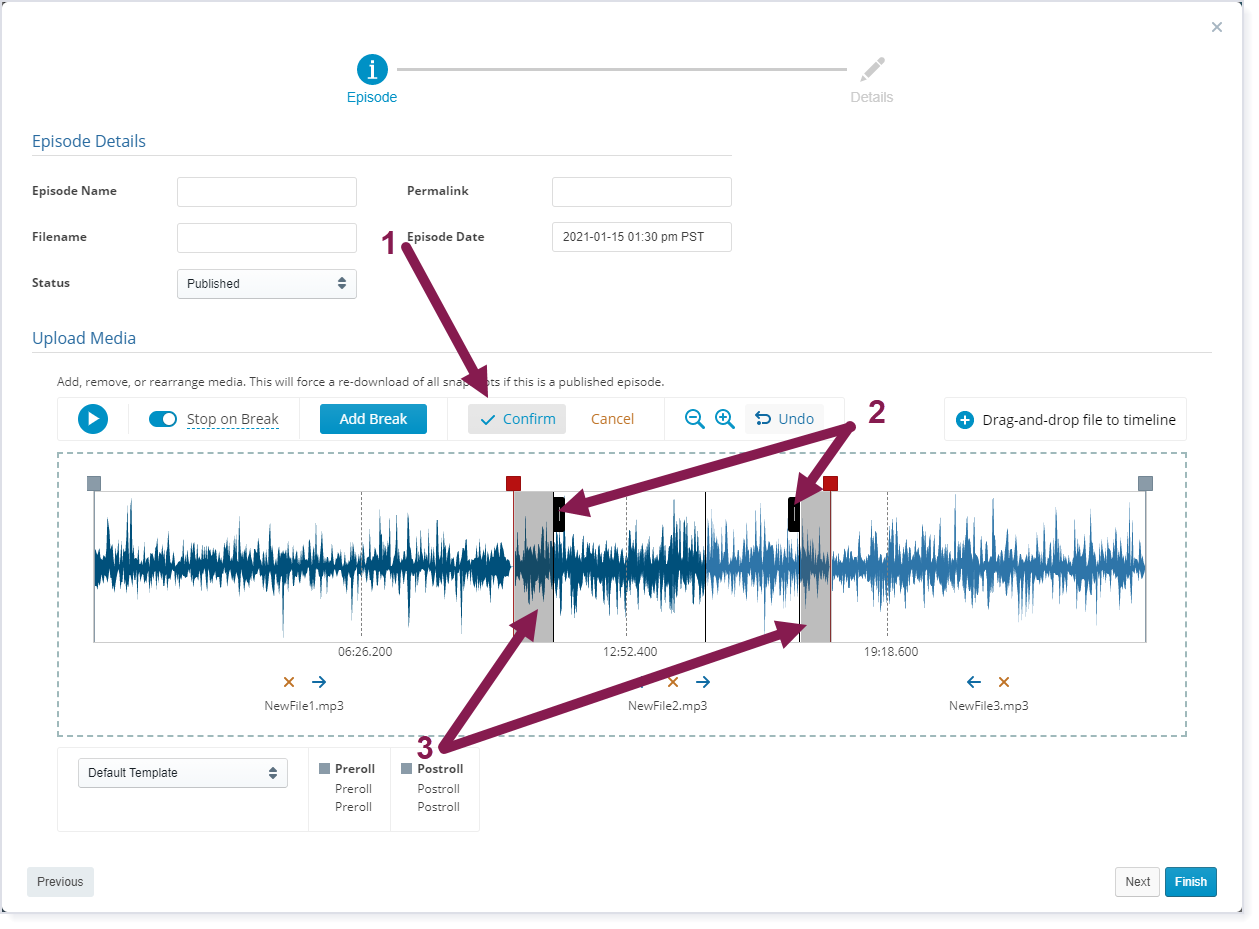
1.Click that file in the waveform to select it.
2.Then click Trim next to the Add Break button.
Once you click, the button changes to Confirm (1) and the trim sliders appear (2).
3.Click and drag the sliders to indicate the part of the file to trim. The gray area (3) indicates the section to be deleted.
4.When you are satisfied with the trim sliders' positions, click Confirm.
Note: The Undo button lets you step backward through any changes you have made, or you can undo a particular trim by clicking the small undo ![]() icon under the trim location.
icon under the trim location.
Cutting
If you need to cut a portion within a file:
1.Click that file in the waveform to select it.
2.Click the Cut button next to the Trim button.
Once you click, the button changes to Confirm (1) and the cut sliders appear (2).
3.Click and drag the sliders to indicate the part of the file to cut. The gray area (3) indicates the section to be deleted.
4.When you are satisfied with the trim sliders' positions, click Confirm.
Note: The Undo button lets you step backward through any changes you have made, or you can undo a particular cut by clicking the small undo ![]() icon under the cut location.
icon under the cut location.
Marking Host Read Ads
Host read ads let you mark portions of a podcast for impression tracking. This new ad type appears with other ad data in reporting.
Note: You can only mark host read ads if the channel has a AmperWave Streaming ID. For more information or to get set up with a AmperWave Streaming ID, please contact Support.
1. Once you have uploaded an episode, click Manage Episode Media on the episode's Detail page to open the editor.
2. Click the Host Read Ad button.
Start and end sliders appear in the waveform editor.
3. Adjust the sliders so that only the host read ad is highlighted.
Tip: click in the highlighted area and drag it to quickly move it to another part of the waveform.
4. Click Add Properties, and fill in the fields as appropriate for the ad and its campaign.
a. Campaign: You can either create a new campaign or select an existing one.
b. Host Read Ad: You can either create a new ad or select from an existing one.
c. Revenue: Select between Flat Rate or Performance (CPM) for revenue tracking.
d. End Date: This represents the end of the campaign and tracking. This can be extended up to two years, if you have a long running host read ad.
e. Tracking URL: Post any tracking URLs for the ad. Click the plus button to add additional tracking URLs.
f.3rd Party Macros: There are four macros that can be used in tracking URLs, this area will give you the text to include in your tracking URL.
5.Click Save to close the editor.
The host read ad is now included in the break list at the bottom of the editor. Click the Settings link under the to open the host read ad's campaign in AmperWave Podcasting.
•Preparing an Episode's Content Files